Request a Prior appointment of Social Security to receive benefits Online involves completing a series of simple steps. And here we will tell you how to do it quickly and safely so that you can access various benefits.
Social Security has made the Electronic Headquarters service available, in order to manage through the Social Security Information and Attention Centers, also known as CAISS. But since March 16 there was a temporary suspension of personal attention as a result of the pandemic generated by the covid-19, for which the service of Electronic record to process from there.
Despite the measure implemented due to the Sanitary Emergency decree, we are going to teach you how to request the Prior appointment of Social Security to receive benefits, so you can carry out the procedure once activities resume.
How to apply for a Social Security Appointment
If you have thought about requesting a Social Security Appointment and do not know how to do it, be careful, because here you will learn step by step what to do. Pay a lot of attention.
Step 1: Enter the website

Although it is not necessary to enter the home portal of the official website of this institution to make the prior appointment, in this article we want to show you how to apply from scratch.
So the first thing you should do is enter the website through this link. Now, you will have to go to the right part of your screen and click on the button Electronic Office.
Step 2: Prior appointment
Then you will go to the box and you must click on the link Prior Appointment for Pensions and other Benefits, which will take you to the next step.
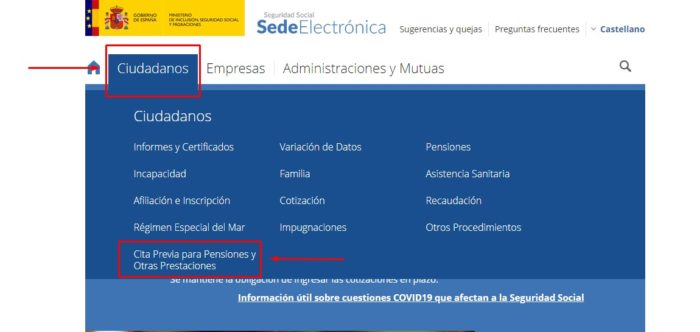
You can also access the option Ciudadanos, located at the top of the screen. You will find a button with the same name as Prior Appointment for Pensions and other Benefits.
Step 3: Get an Appointment
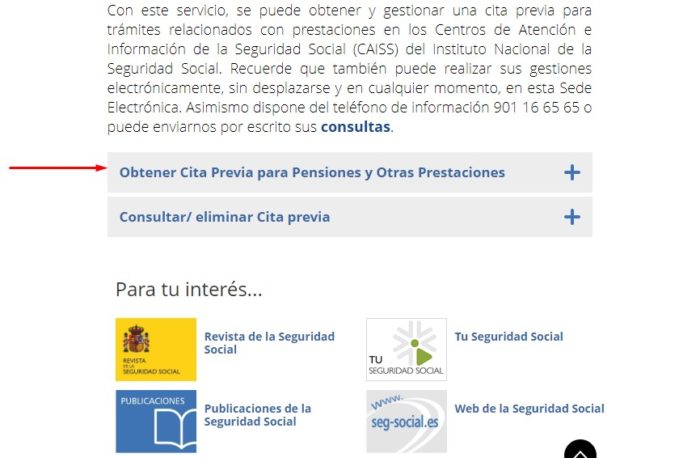
You will go directly to the option that says Get an Appointment for Pensions and Other Benefits, where you will click on the sign +. All options will be displayed.
Step 4: Access form
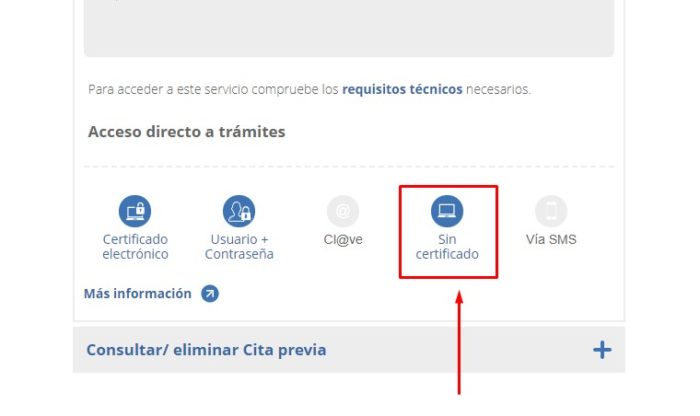
There are several access options and one of them is through the button Digital Certificate, which must be duly certified by Social Security.
Another way to enter is using the alternative Username + Password, as long as you have previously obtained a username and a password or password.
But for the purposes of this article, we will use the option No certificate, in case you don't actually have one. It is the most common of the three and the easiest to get an Appointment.
Step 5: Complete the form
Then you will complete the form with the data required by the system as name and surname of the applicant. It includes identity document (NIF if it is a Spanish citizen or NIE if the one who carries out the procedure is a foreigner).
The phone number is optional, as is the email. Placing the phone number is important because text messages will arrive there in case there is any modification of the appointment.
The option Appointment Search authorizes the system to search and find an appointment. It can be in the center closest to the user's postal code, in any of the province where they reside or where they wish. Carry out the procedure in Madrid or in any other city in Spain.
It is always best to select the office that is closest to where you live for ease of use. Finally, you will have to answer the security question and click on the button Next.
Step 6: Choose the category
Then you will have on the screen the categories that you will display to select the one that indicates Pensioner benefits. Then, you will choose the category of interest to generate an appointment. At the bottom press the button Select and Continue.
Step 7: Choose the venue and schedule
The next thing to do is choose the location closest to the zip code and the time available to generate the appointment. Once this step is done you must press the button Select.
Step 8: Verification of the appointment
The next step is the confirmation of the appointment. The system provides a code, but also indicates the location, date and time chosen for the appointment. You can download this information in PDF by clicking on the corresponding option. You will also receive an email indicating the information you have just managed.
Recommendations when generating a previous appointment
Pay close attention to these recommendations to make the request for an appointment even easier.
- Do not forget to fill in the fields marked with * because they are mandatory. You will not be able to advance if you do not complete them
- The system has a "Guide to Obtain, Consult or Delete Previous Appointment with Digital Certificate" or "Guide to Obtain, Consult or Delete Previous Appointment without Digital Certificate" to make inquiries in case you cannot just make the request for yourself
- To make the appointment, you must be clear about the reason why the request is made. Similarly, the system indicates which ones it has available